Features list
Looking for some help? Check out the PDFs below. If this doesn’t solve the issue, let us know on Facebook.
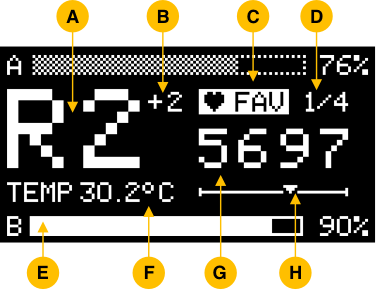
Default Screen
Highly Informative Screen contains:
- A bold band and channel
- B center frequency deviation
- C current mode
- D up to 44 favorite channels
- E active antenna
- F module’s temp / voltage / CPU
- G precise frequency
- H position on the spectrum
Auto Search
A mode searching for the strongest signal – it’s the fastest and easiest way to find a currently transmitted video signal. Press and hold the button to add the channel to Favorites.
Favorites
A list of your saved channels, and a default Pirx screen (if at least one channel is saved). Press and hold the button to launch a Context Menu for a given channel, which enables a manual tune; an emergency quad detection; a removal of a channel from your Favorites list.
Channel Mode
This mode enables you to select a channel and a band manually, regardless of the currently transmitted signals. Push the button up or down to change a channel, or press it longer to change a band. You can also add a channel to Favorites, by selecting it and long pressing the button.
On-Screen Display
There is no need to take off your goggles, as you can take a look at Pirx screen having them on. Remember to customize PAL/NTSC systems, as well as to select stretch option to adjust the screen to your goggles. Also: due to hardware limitations, OSD is available solely on black screens.
Video instruction how to make a MOD for Eachine pro58 (by Mirko FPV)
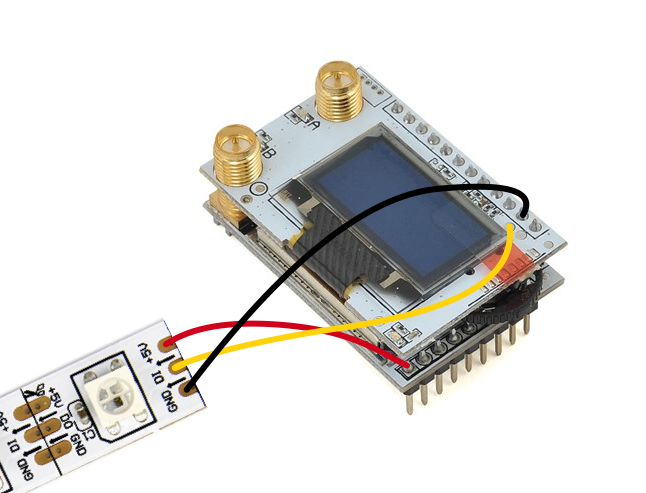
LEDs Strip
What about the same LED color on your goggles and your drone? By attaching the RGB LED strip to the module (take a look at the diagram) you can use Pirx to choose the color and display effect.
Please note that the maximum number of LEDs is 5, and that the use of LEDs largely consumes battery.
There is no support for LEDs feature when the OSD is running.
Quad Detector
An easy way to locate your lost quad, searching by sound. As you set a direct antenna in the Settings menu, go to the Quad Detector function in the Context Menu of a given channel.
Call Sign
Displaying your name/nick on the screen saver. Go and set it up it in the Settings menu.
Manual Tune
Video transmitters are far from perfect, and sometimes they may change channels’ frequency. Using Manual Tune will help you to adjust the frequency to the actual strength and quality of the signal, with 1mHz precision. The function is available in Context Menu of a given channel from Favorites.
Spectrum Scanner
Scanning a wide range of frequencies from 5400 to 5912, presented on the chart with the strongest signals marked. A useful feature enabling you to check the number of signals nearby, and a vital one for the the video transmitter to work properly.
Remove Channel
Any unwanted channels saved in your Favorites? Press and hold the button to launch Context Menu and remove the channel from the list.
Battery Alarm
It’s good to know if you’re running out of battery. Turn on battery notifications in the Settings menu.
Calibration
Calibration enables to find the strongest and the weakest RSSI value in order to determine the best parameters for signal reception. It’s launched automatically right after the software installment. You can restart the calibration process by choosing this option in the Settings menu.
Flip Screen
Go to Settings menu to find a flip screen function, perfect for a non-standard purposes, i.e. other than a standard Fatshark goggles usage.
Bootloader
It turns the module into bootloader mode in order to upgrade the firmware. Available in the Settings menu.